


Three simple techniques to better record the acoustic guitar
Trying out different recording techniques is a great way to learn how much microphone placement can drastically affect the sound of your recordings. In this article, we discuss three simple techniques for recording an acoustic guitar that will provide you with a wide range of different sounds, serving as a foundation for experimentation.
The best microphone for recording acoustic guitar
Firstly, you will need one or perhaps two microphones. Condenser microphones are particularly suitable for recording acoustic guitar, as they are known for their ability to capture many details across the frequency spectrum.
For the three techniques we are going to explore, we will use two different types of condensers: a large-diaphragm condenser, such as the NT1 Signature Series, and a pair of small-diaphragm condensers, like the NT5, which are available as a matched pair for this very reason.
You will also need an audio interface like the RØDECaster Duo to convert the microphone’s analog signal (XLR) into a digital signal (USB) that you can send to your computer. Finally, you will need recording software on your computer, typically a DAW (Digital Audio Workstation) like GarageBand, Adobe Audition, Ableton Live, or Reaper.
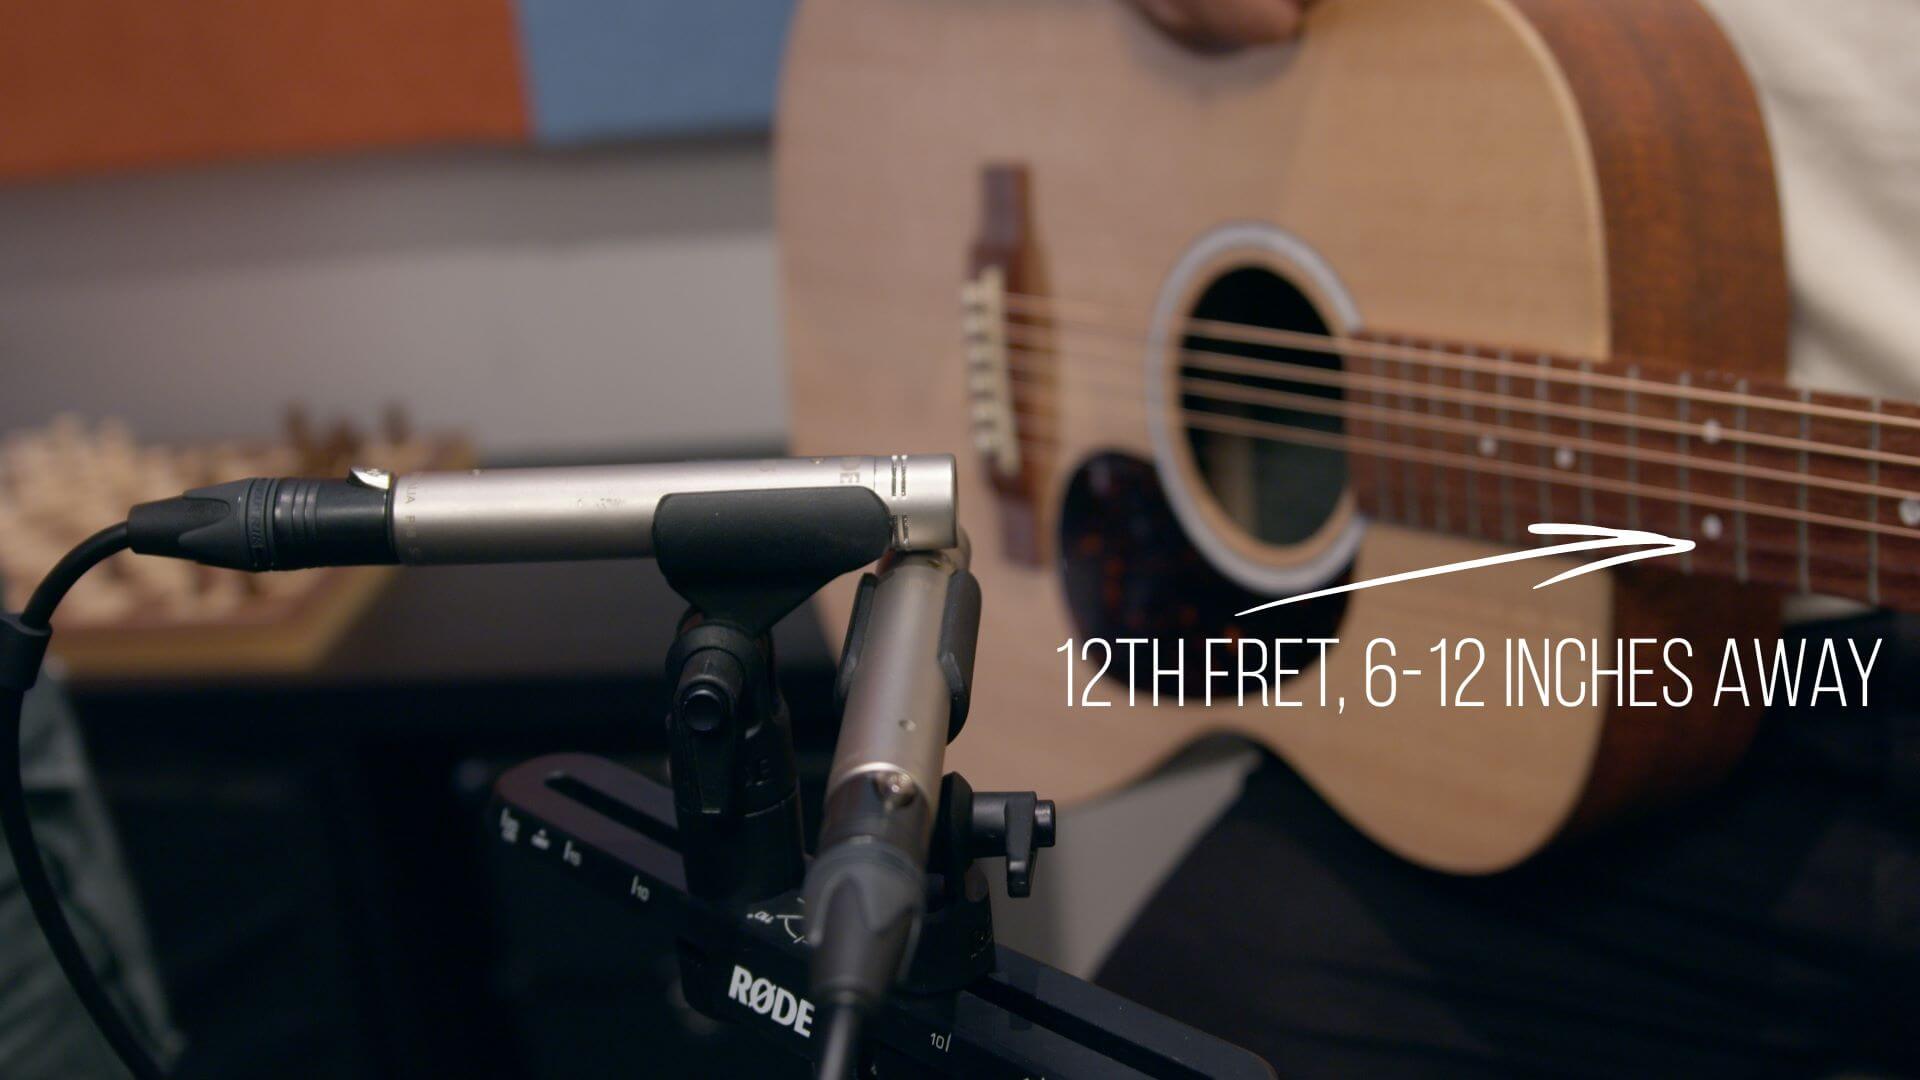
Technique 1: Place a single microphone on the 12th fret
The first technique is ideal for getting started, as it is very simple and produces a nice, even tone, ideal for a wide range of recording and mixing applications.
We recommend a large diaphragm condenser microphone.
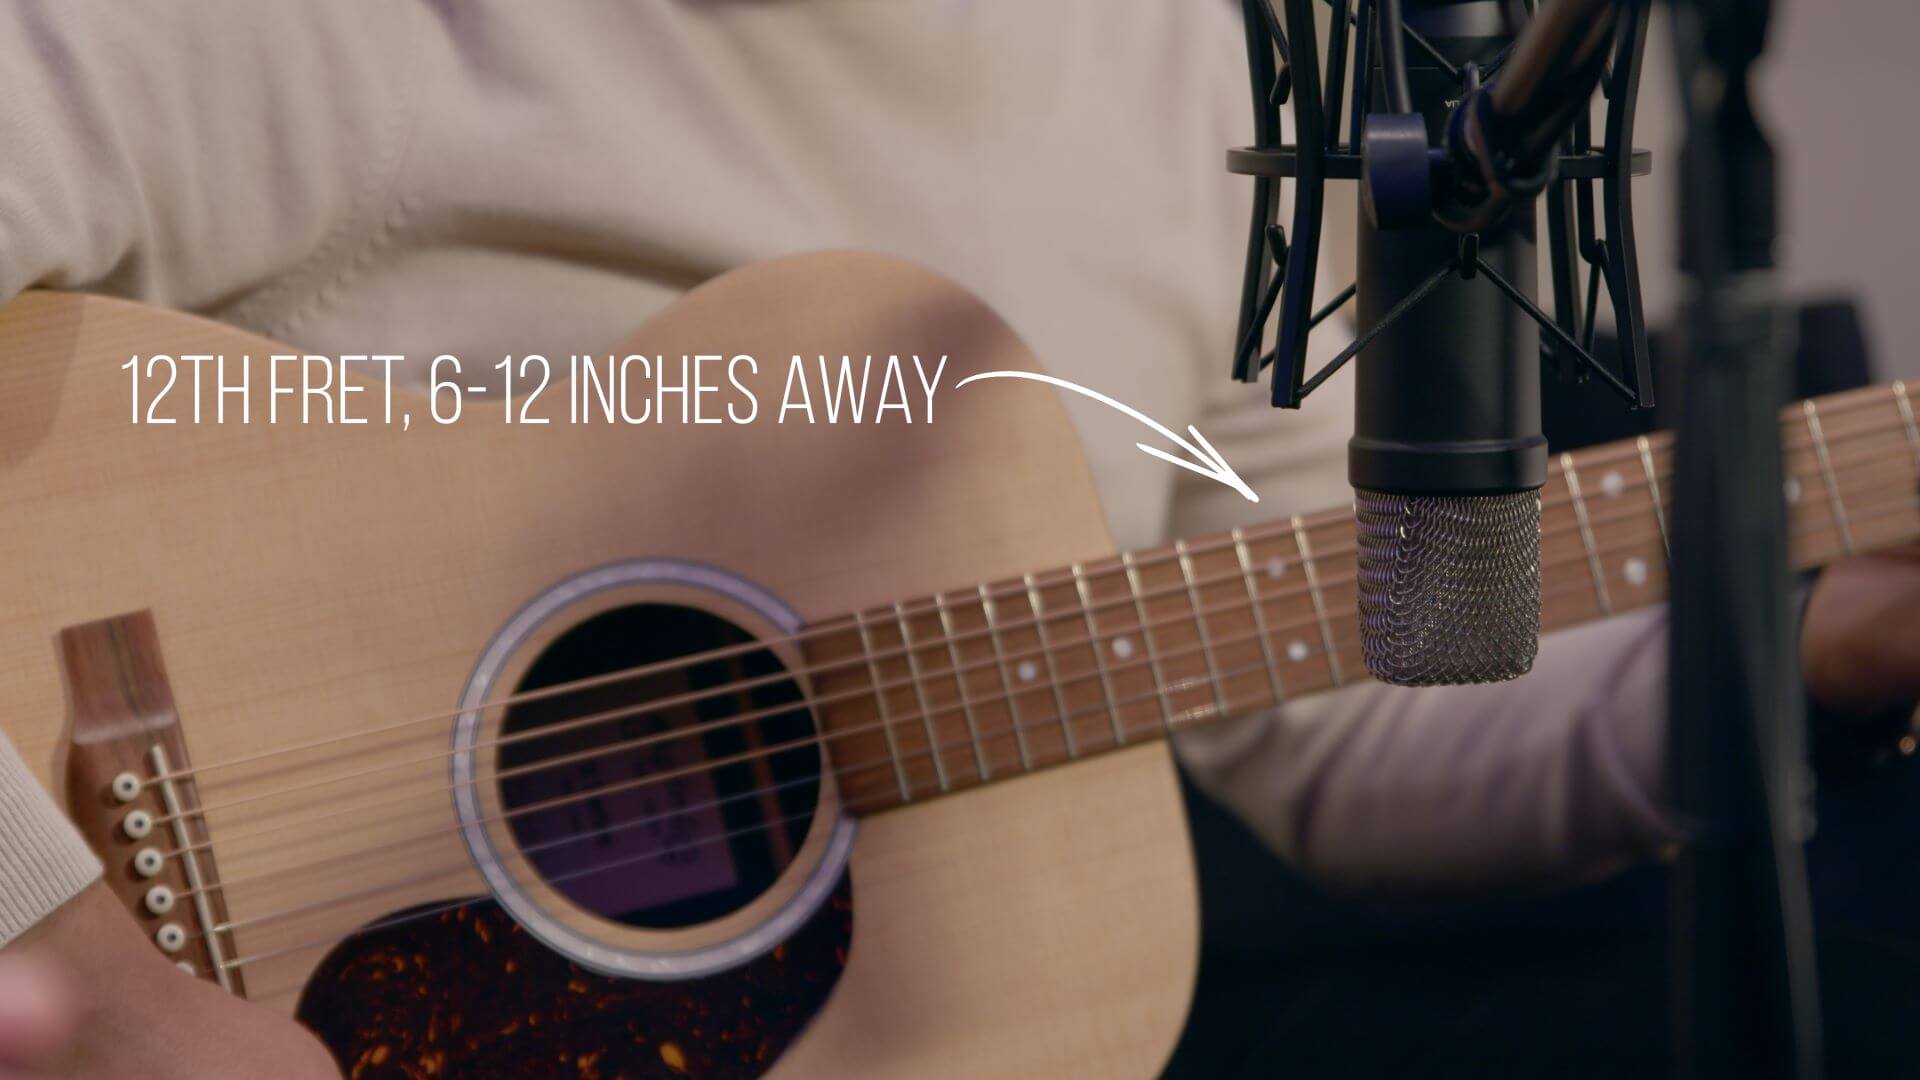
Position a large-diaphragm condenser microphone aimed at the 12th fret of an acoustic guitar, placed about 15-20 cm away, to produce a detailed and balanced sound.
With the microphone mounted on a stand, place it about 30 cm away from the strings, pointing towards the bridge. This technique provides a balanced tone, as it does not capture too much direct sound from the guitar’s soundhole, which can produce excessive low frequencies that may sound muddy and boomy.
Technique 2: Single microphone on the bridge
The second technique is very similar to the first – recording with a single large-diaphragm condenser microphone – but by changing the point of focus, we can achieve a very different result.
With the microphone mounted on a stand, place it about 30 cm away from the strings, pointing towards the space between the bridge and the soundhole. This technique will give you a brighter tone than the 12th fret technique, which can help your guitar stand out more in a mix (depending on the other instruments, of course).
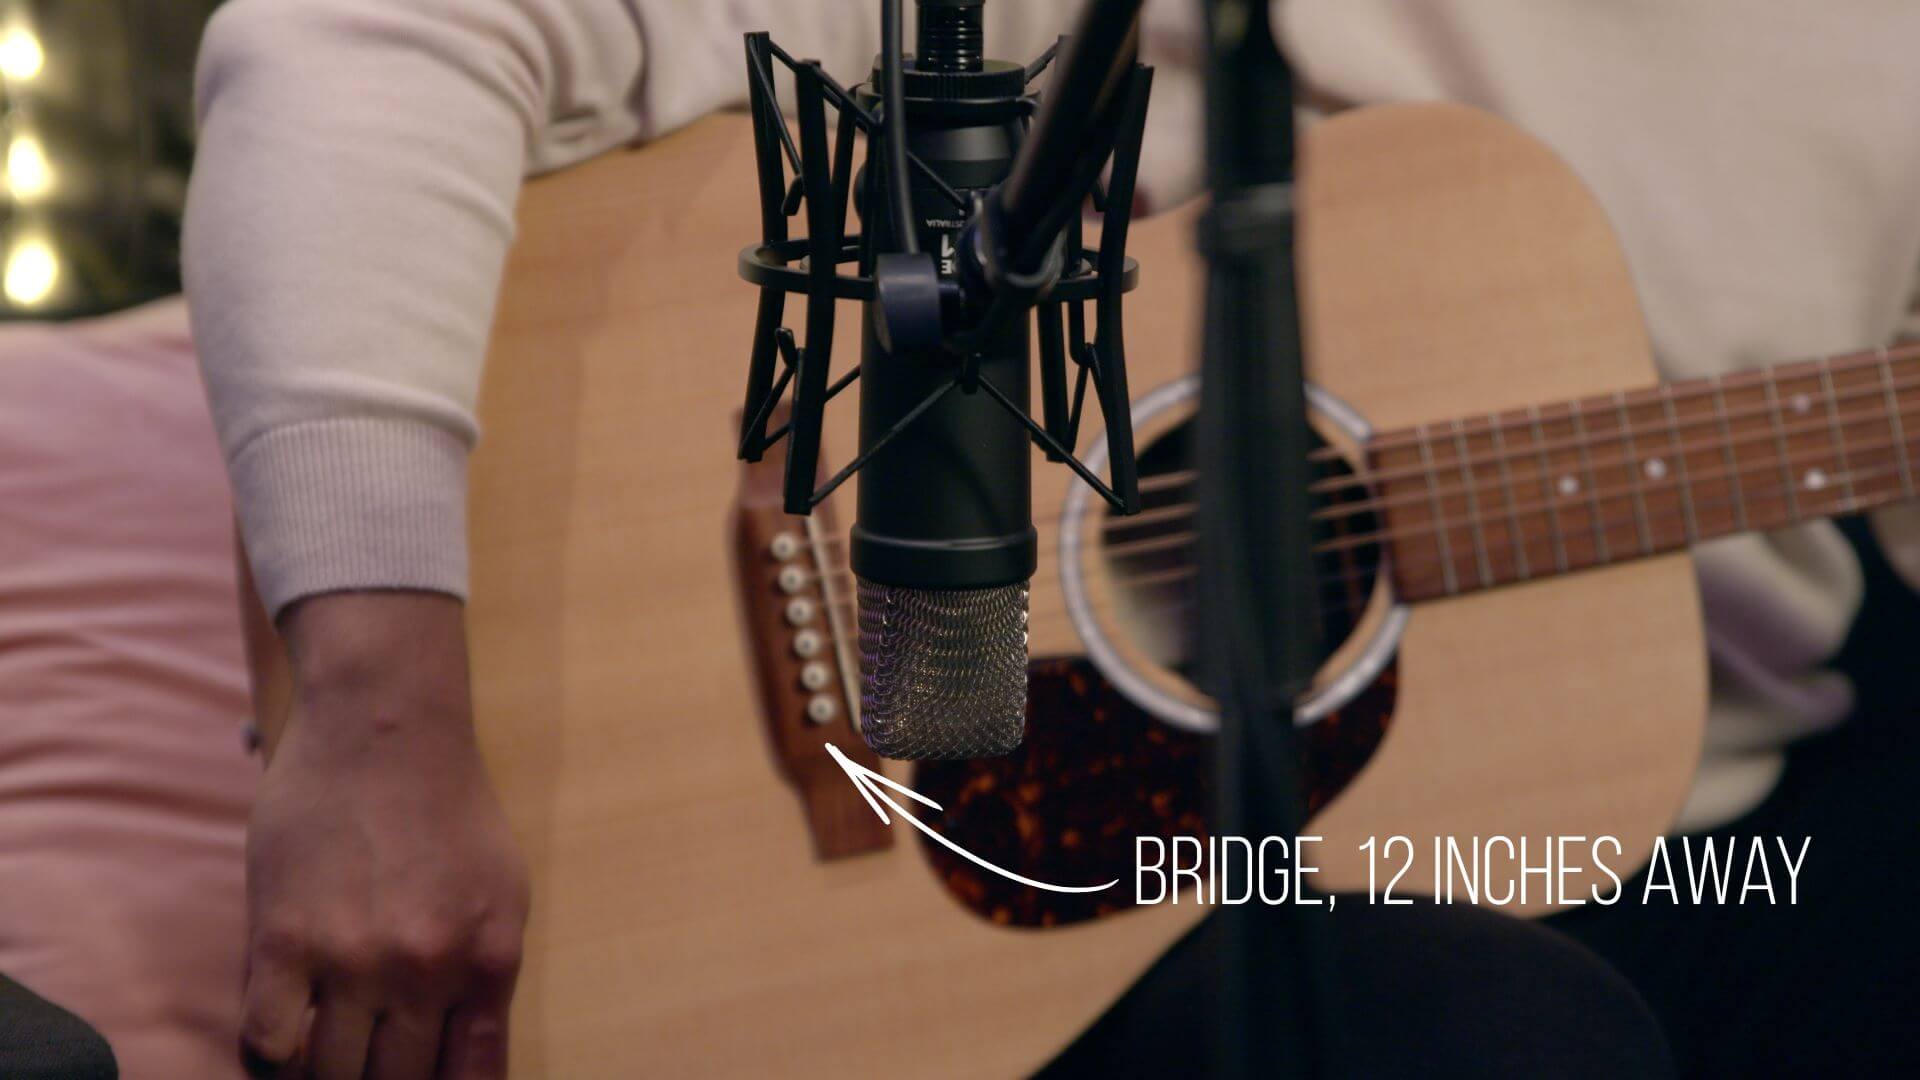
Positioning a large-diaphragm condenser microphone aimed at the bridge of an acoustic guitar, placed about 15-12 cm away, produces a bright and percussive sound.
This technique is also perfect when you want your acoustic guitar to play a more percussive role in your track, as the string noises (especially when using a pick) will be more prominent with this technique. For the same reason, it is ideal for fingerstyle (or fingerpicking), as the nuances of your hand will be more pronounced: move the microphone a little closer to the strings when doing fingerpicking.
Technique 3: Stereo X/Y configuration
The last technique we are going to look at requires a bit more setup, but it’s worth adding it to your options. The X/Y stereo configuration is a proven technique for making wide, complete, and detailed recordings.
MATERIAL
For this, you will need two microphones, ideally small-diaphragm condensers like the NT5 (which are available as a Matched Pair), but feel free to experiment by trying other types of microphones, just make sure you have a pair of them.
As you need to record two microphones at the same time for this technique, you will need an interface like the RØDECaster Duo that has at least two XLR inputs to record the audio from your microphones on the computer.
When using multiple microphones on the same sound source, it is important that they are placed at the same distance from the instrument to avoid phase problems, which can cause unwanted artifacts in the audio.
You should place both microphones so that their capsules are aligned with each other, but oriented 90 degrees apart. You can use the Stereo Bar, which is made for this task, or a pair of articulated arms to achieve this spacing.
Next, similar to the first technique, place the microphones at a distance of 15 to 20 centimeters from the 12th fret and point them so that both are at a 45-degree angle to the fretboard, with one microphone pointing up the neck and the other towards the soundhole.
Record each microphone on a separate track in your DAW and pan one fully to the left and the other to the right to create a wide stereo image. The result is a lush and full sound, especially if you add a touch of reverb, and it is particularly useful when the guitar is the main element of a song.
This recording technique mimics the slight differences in what we hear with our left and right ears in everyday life, allowing us to perceive the direction from which a sound is coming. Therefore, stereo recordings offer us a more immersive sound experience and bring the recording to life.
An excellent starting point for further experimentation!
Sepúlveda 134 / Barcelona / Tel.: 930 186 876
Ardemans 9 / Madrid / Tel.: 910 88 93 30
